|
|
|
|
PC GAMES
PC GENRES
SEE ALSO
INFORMATION
|
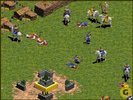
Goal: Capture the artifact and destroy the temple of the Seven Yellow Men. The Skinny: This one is a toughie, so expect to restart this one several times. At the outset, you are in the middle of a battle in the northern corner of the map. This is where the temple and the artifact are located, but unfortunately you can't hang around long enough to destroy the temple. You'll need to immediately select your men then right-click on the transport boat near them to the east. They will make their way to the boat, but most of them will die or be converted by enemy priests. You need to get at least two of them onboard the transport (if you don't have at least two, you should probably restart the scenario). To make matters worse, your small navy is under attack, as well. Take the transport and one war galley and head north to the top of the map, then east. Now is a good time to mention the lone transport you have down near the bottom of the map. Be aware of where it is - you will have to use it and use it shortly. Use your war galley to kill the two bowmen on the land near where your galley and transport ship are - they should be as far north and east as they can get. Disembark your two remaining soldiers and begin to move them southward on foot (now is a good time to save the game). Their goal is to make it to the transport near the bottom of the map. The problem is that they are traversing a forest maze littered with enemy towers and archers. You might just have to make a dash for it. When you get at least one of your soldiers onboard the transport, you can then sail south to your allies. Once you disembark and go into their city, you gain control of all the units. There are no villagers; what you have is all you're going to get. This means that the four priests you have are crucial to your chances for success, since you'll have to use them to heal your soldiers. You also have two catapults that you simply must keep alive. The other key units you have are elephant archers. Use them on your front line to draw enemy fire. They can take a lot of damage before dying, so they'll divert the fire of the enemy and you can withdraw the elephants to heal them. Now that you're in the allied city, load up a transport with the elephant archers and several ballistas. Carefully probe the far shore to see the various towers. Each tower is protected by a ballista, and there are archers scattered throughout. You need to land and take out the two ballistas down near the southern edge of the map. Once you do this, you can ferry the catapults over to destroy the towers. Be careful of your catapults, though. You'll need them for the many more towers and ballistas further inward, so withdraw your catapults if they are in danger. Use the elephant archers to probe inward, and when you trigger a ballista attack, use your own ballistas to destroy them. It's important to heal after each encounter. Once you fight your way westward along the southern edge of the map, you will come to some more transports. To the west of these is an enemy dock. To the west of this dock are six to eight archers. Once you attack this dock or the nearby tower, the archers will come after you, so be prepared. After defeating the archers, there is another tower to destroy. This one is along the western edge of this landmass. Once it's destroyed, you are ready to begin the final phase. Move your ballistas and a few archers to the western edge of the landmass. Use a transport to sail north and scout the waterways. Lure any enemy ships down to where the ballistas wait, so they can destroy the enemy ships. Once the seas are clear, load a transport with the elephant archers and some infantry. Find a spot to land on the enemy landmass, somewhere in the middle of the long stretch of land, out of range of the many towers. Once you disembark, enemy troops will hurry to attack you. Kill as many as you can before you are in danger of losing too many units, then jump back on board the transport and go back to the priests to be healed. Repeat this process until you establish a beachhead. When the initial danger from the troops in this lower level has passed, ferry over your forces and land them. Begin to march southward. Use the catapults to destroy any towers you see, and you will see a lot. When you get to the far south, you will see a path that heads uphill. From this point on you simply need to slowly march up the hill back towards your original starting position. Have your cavalry hotkeyed and near the front. Several enemy priests will attempt to convert your units, so you'll need to use the cavalry to get to them fast. Use your elephant archers to draw fire and heal them as necessary. Keep destroying towers with your catapults. Repeat this as you advance. Destroy the enemy temple, tear down the wall to the artifact, and you win. Dangers: This is a scenario where the enemy is essentially passive. They don't build and attack you. The real danger you face is the attrition of your forces as you battle towards the temple and the artifact. Be cautious and ready to withdraw your forces to heal them.
|
|
|||||||||||||||||

 Page 17 of 36