|
| GAMESPOT.COM | PC GAMES | VIDEO GAMES | PC HARDWARE | GAMESPOT LIVE | GAMEBUYER |
| ||
PC GAMES News Reviews Previews Movies/Media Downloads Hints/Codes GameGuides.com Special Features Beta Center Release Calendar Forums Top Games
PC GENRES |

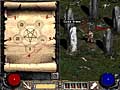
With the bark scroll in hand, it's time to return to the rogue encampment and show the scroll to Akara. You're fairly far from town, so it's much more likely that you'll want to use a shortcut, either a town portal scroll or a waypoint. Since your next destination (after the rogue encampment) is the stony field, a town portal won't be as cost effective as simply finding the waypoint. If you are healthy enough (and have health potions available), consider exploring dark wood to locate the waypoint and defeat the native creatures. Tristram is tough; the higher your level and the better your equipment, the easier your journey to Tristram will be. UNIQUE MONSTER: In the dark wood, you'll encounter Treehead Woodfist, an extra fast and extra strong unique monster. Extra fast doubles Treehead's (and its minions) attack rate, while extra strong increases damage and to-hit percentage by 25. The bark scroll is useless until you return and show it to Akara. Once inside the rogue encampment, approach Akara and speak with her. Akara translates the runes and returns the scroll to you. Right-click on it to read the correct sequence of cairn stones to open the portal to Tristram. Act I, Quest III Log Entry #3: Go to the cairn stones in the stony field. Touch the stones in the order found on the scroll. Enter the portal to Tristram, but beware the danger that lies ahead. Once you return the bark scroll to Akara, you have the information required to activate the portal to Tristram. Locate the cairn stones formation, positioned in the stony field. Open your inventory while standing near the cairn stones. Right-click on the bark scroll to watch the correct sequence of stones. Click on the cairn atones in the correct order to open a portal to Tristram. Should you enter the incorrect sequence, the portal will not be opened. Start over again and complete the full, correct sequence to open the portal.
Tristram is deadly - be prepared! Search Tristram to locate Cain's gibbet near the monster-infested center. Deckard Cain is currently kept in a hanging cage. Defeat the monsters surrounding the cage and touch the cage to release the Horadrim sage. Once Cain is rescued, a town portal opens to the rogue encampment. Follow Cain or remain and finish off the tough monsters crowding Tristram.
|
|
|||||||||||||||||||||||||||
| ||||||