|
|
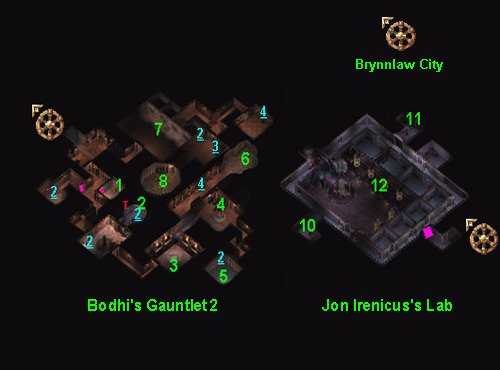
1.
As you enter the second level of Bodhi's Gauntlet, you will need to
locate the 2 secret doors. Open one of them and then click on the
"Horseshoe Switch" This will unlock the second magic door. As
you open it, 4 Trolls will spill out and attack. Take them out and then
search the room. You will find 2 Mithril
Tokens.
2.
Make your way onward until you come to a room with a broken statue.
Search the "fire pot" by the door for another 2 Mithril
Tokens. Once you have located them, open the door and enter the room
with the small pool. Search the waters for the "Mind Flayer
Painting", "Minotaur Horn", and 2 more Mithril
Tokens.
If you look
closely along the wall of the room, you will find 3 statues. Each statue
holds a painting, and each Statue is trapped (you can not disarm the
traps). You may want to save your game now. The first statue will cast a
death spell (you can save vs.) and is holding the "Troll Painting".
The second statue casts a Cloudkill spell and holds the "Umberhulk
Painting". The final statue casts a Fireball spell and holds
the "Djinni Painting". Grab all 3 paintings and then
continue on.
3.
Room #3 is somewhat interesting. Along the walls, you will find
4 Golden Orbs. You need to have at least one member of your party stand on the
Mosaic that is in the center of the room. Have another member of your
party click on a Golden Orb. Each Orb does something different. Starting
from the left hand Orb and going towards the right, here are the effects
of each Orb: 1. Casts Slow, 2. Cast healing spell, 3. Casts Haste,
4.
Casts Lightning. Each spell is centered on the person who is standing on
the Mosaic, but the Slow, Haste, and lightning spells can hit any
targets in range. The best part about this room is that you can heal
your group completely, and as often as you like. The free Haste spell is
also nice, but it will quickly cause fatigue in your entire group.
4.
When you enter this room, Bodhi will be waiting. Apparently, she grew
tired of her game, and has decided to finish you off. She will then
attack your group. To her amazement (and probably yours as well), your
main character morphs into "The Slayer" and then begins to
kill everything in sight. This is great, because you will rip it up on
the Vampires. However, you will also kill all of your group members. The
best idea is to leave your group in area 3, and take only your main
character into area 4.
After the
battle with Bodhi ends, she will escape (yes again...) to warn Irenicus about
your sudden transformation capabilities. After a short period, your main
character will return to normal, and then hold a small dialogue about
what had just happened. After the discussion, check out the Minotaur
Statue. You will find that the Statue is missing both of it's horns. You
should already have one of them from area 2. If you head to area
5, you
can pick up the second Minotaur Horn. When you place both horns on the
statue, the door to the exit will open. You could step through it now,
but you will miss so much. Take this chance and head for area #6. Also,
if you rest after the fight with Bodhi, your main character will change
into the Slayer again, and he will attack your party.
5.
Search the room for the Minotaur Horn #2,
2 Mithril Tokens, and a "Limited Wish Spell Scroll".
6.
You should explore this area cautiously. You will need to fight a group
of Minotaurs and a Gauth, but it is worth it. Search the small water
troth for 4 Mithril Tokens and 400 gold.
7.
At location #7, you will find 4 doors, each matching one of the 4
Paintings that you have found. Think of the Paintings as keys. When you
click on a door, a monster pops out. The Mind Flayer will drop the
"Flame of the North" sword, and the Troll will drop the "Malakar
+2". The Djinn doesn't drop any neat items, but he is worth 10,000
exp. Finally, the Umberhulk door will open a new path (ohh and a
Umberhulk). Follow the path down to the first room. Inside, you will
find 2 Clay golems, and a locked chest. When you open the chest, the
Golems will attack. Inside the chest, you will find the "Gesen
Bow String" and 4 Mithril Tokens.
8.
On your way to room #8, check the vase and the table. You will find
another 5 Mithril Tokens, 200+ gold, and a "Maze Spell
Scroll". Enter room #8 and check out the "Bizarre
Contraption". This machine will spit out one of 4 items. Each item
has a different cost (using tokens). You can get as many items out as
you have tokens for, or you can spend all of your tokens on one thing.
If you look on the map, you will see that you can find up to as many as
21 Mithril Tokens. Here are the prices and what you get...
5
Mithril Tokens = Boots of Grounding (Electricity Resistance
+50%)
10 Mithril
Tokens = Boots of the North (Cold Resistance +50%)
15 Mithril
Tokens = Boots of Speed (Increases Movement Rate)
20 Mithril
Tokens = Jester's Chain +4 (has an Armor Class of 1, and is
colorful)
Now, it is up
to you as for what to buy. Personally, I suggest the Boots of Speed and
the Boots of the North. Strong armor is not too uncommon in this game,
but a good pair of boots is. Having Boots of Speed is like having Permanent
Haste. (yes your attacks will be faster also).
9.
(not shown on map) Test of Madness, Sanity, and Clarity:
Once you are finished with the "Bizarre Contraption", return
to room #4 and exit through the door that the Minotaur Statue opened. As
you enter the new area, you will be attacked by a horde of Kobolds. Kill
them all, and then an Avatar will appear. He will present you with his
"Test of Madness, Sanity, and Clarity". There are many choices
that you can make to get through this area. Not counting exp, there is
not a lot to be gained outside of the areas that I mention. I will tell
you the quickest way through, which will allow you to gain the only item
of value.
When the
Avatar tells you about the "test", just answer him by saying
"Ok I will take your test" (or something to that value). You
will be taken to another room which has a Spore Colony. Kill the Colony
and the Avatar will return and ask you another question. Answer him
" A Splinter", and he will warp you to a room with 4
"Whack-o's" who are sitting around a dining table. Before you
speak with anyone, go over and grab the "Cloak of Reflection"
from off of the table. After you have it, go and speak with one of the 4
people in the room. They will ask you a series of 4 riddles. Answer each
one correctly, and you will be done with this "test". The
answers are...
Riddle #1:
Nothing
Riddle #2:
A River
Riddle #3:
Fear
Riddle #4:
Memory
Now, if you
want to get one last item out of this place, you can guess the last of
the four riddles incorrectly. It does not matter which answer that you
give, as long as it is not "Memory". You will then be warped
to a room with a "Distorted Machine". Click the machine one
time, and you will gain "Lium's Journal". Exit the machine
and then read what the Journal says. If you can not come up with the
code for the day (and I don't blame you if you can not), then here it
is...
1.
Mithril
2. Ruby
3.
Emerald
4.
Sandalwood
5. Jade
6. Onyx
When you
correctly hit the proper order, you will gain the Bracers of Defense
AC5, and you will be warped away to the exit of this area. When you
do reach the exit, the Avatar will hold a small dialogue with you
(unless you threatened him, then you will be "talking"
with a Mind Flayer). After the dialogue, you can walk right out of the
area.
10.
After exiting the Test of Madness, you will enter the Laboratory of Jon
Irenicus. Saemon Havarian will be waiting for you when you enter. At
this point... Just allow bygones to be bygones, and make friends with
this untrustworthy Sea Captain. He will tell you of an easier way to
defeat Irenicus. Go upstairs and free the Madmen. Their fury will be
directed towards Irenicus, cheaply buying you the army that you will
need to win the battle. Do as Saemon suggests, and cross the map towards
the stairs marked as #11 (do not enter area
#12 just yet).
11.
Cross the Lab to the other side, and then rest... Save your game... And
then head up the stairs. You will run right into "Lonk the
Sane". He will try to make you return to your holding cell, but
that is not where we want to go. Just ask him how much it is worth to
him to have all of the people freed. He will haggle the idea, but when
you offer him 2000 gold, he does not refuse. If you pay him too much or
too little, he will freak out and attack you. Alternatively, you could
attack him also. However, you will not have a chance to rest between now
and the battle that is coming. Lonk can put up quite a good fight. Just
pay him the 2000 and prepare to face Irenicus.
12.
After freeing the "Crazies" of the Asylum, you will be
teleported directly in front of Jon Irenicus. A short dialogue sequence
begins, and then the fighting starts. Chances are, a clone of each
member in your party will warp in and attack you. You may want to summon
some spiders or something to keep the clones busy while you deal with
Irenicus. Take down Irenicus and then he will flee. His Assassins will
attack you, hoping to finish you off.
[Spoiler
Warning!] If you brought Yoshimo to the
Asylum with you, then you already know that he was working for Irenicus
the entire time. Anyway, he will be part of the assassin attack. You
will need to kill him, but you can still help the guy out by ripping his
heart out of his corpse and taking it to a temple (no I am serious...
Check his corpse!). The next time that you are in the Slums,
stop by the Temple of Ilmater (on top of the Copper Coronet) and have
the Priest release Yoshimo's Heart. This will gain you a huge 200,000
exp!
[End
Spoiler]
After the
fight with Irenicus, if you rest, there is a chance that you will have
another dream. At the end of the dream, you will gain the ability to
change into the Slayer at will (Do so at your own risk!! Every time that
you morph, you will lose 2 reputation points. If you run out of
reputation points, you will die).
Once you have
done all of the above... Do not just take off heading for that portal.
Go back up to the Asylum and check the area. Again, you will bump into
Saemon. If you are still bent on his betrayal, you can kill him now.
However, I will suggest against it. If you kill him now, you will be
left with only one option... To enter the "Underdark". Instead
of killing Saemon, speak with him about his escape route. He will warp
you and your group back to the Island. From there, you will need to
locate him in the city, where you will be sent on a series of lesser quests. You will miss out on a lot by not befriending Saemon, but the
choice is yours. No matter what you choose to do, be sure to return to
the Asylum and search the area. There are a lot of things that you can
search through now that were not there before. If you made friends with
Saemon and he warped you outside, you can simply re-enter the Asylum and
do your searching. You should locate 2 Rogue Stones, a Staff of
Thunder,
the "Horn of Silence", Irenicus Journal 1 and 2, and
Jon's Key. If you want to just enter the portal, you will still need to grab
Jon's Key.
After you have
found these items, you can either enter the "Underdark" or
return to the City
(suggested).
If you enter
the City, you will need to locate Saemon inside the Vulgar Monkey. He
will tell you to swipe the Pirate Horn from Cayia after dark. Go to
Cayia's home (after dark) and grab the horn. Meet Saemon on the docks,
just past Desharik's Ship. Give Seamon the horn, and then Desharik will
show up. Fight off the pirates, and then the Chapter will end. By taking
this path, you will find yourself in the Sahaugin
City, before you enter
the Underdark. Think of this as a way to get a few extra tasks and
items...
|
|