 |
|
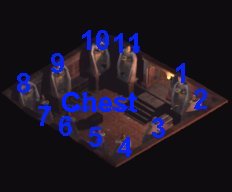
1. Grinning Skull
2. Hourglass
3. Mirror
4. The Gagged Man
5. Sword Medallion
6. Sun Medallion
7. Sundial
8. Jar of Water
9. Worn out Boots
10.
Golden Circlet
11.
Star Medallion |
After
you place each of the 11 items into the correct statue, a
message will appear telling you to check the chest again. Open
the chest in the center of the room and grab the Sapphire
Stone and the "Dusty Rose Ioun Stone".
5.
Shimmering Portal: In this room you will run into Ruhk, a
pack of Mephits, and a shimmering Portal. The first thing that
you should do is take out Ruhk. Once he and the Mephits have
been dealt with, and if you have the Opal, Ruby, and Sapphire
Stones, then click on the portal. The first click will warp a
Wolfwere in, which you will need to kill. The second click
will warp in a Demon that, again, you will need to kill. The final click will warp in a Genie that will hand you the
"Doomplate +3".
6.
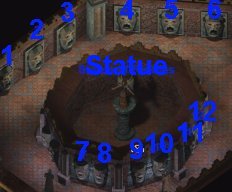
Statue of Riddles: For this puzzle. you will find 12 faces
that all request that you stick your hand in their mouth. When
you do so, you will be warped to the center area and asked a
riddle from the "Statue of Riddles". You must
correctly answer each of the riddles. Answer correctly, and you
will move to the next face. Answer incorrectly, and you will
suffer dearly. Below is a labeled image and the correct answer
to each of the 12 riddles.
 |
|
1. [3] Ice
2. [8] Fire
3. [5] A Coffin
4. [1] A Candle
5. [7] Darkness
6. [4] Stars
7. [7] Shadows
8. [2] A Sponge
9. [5] Breath
10.
[2] Fish
11.
[1] A Secret
12.
[5] A Hole |
|
After
correctly answering each of the 12 riddles, the Statue will
reward you with 5000 exp per character, and with the "Ring
of Regeneration".
After
you have solved all 3 of these puzzles (The chest item puzzle,
the Shimmering Portal, and the Statue of Riddles), then work
your way back to the east side of the room, near area #2. You
will find an exit at the end of the small hallway. Take the exit
and you will enter a further section of the Gauntlet (on level
1).
7.
You will come to a room with an Ancient
Tomb. Every time that
you click on the Tomb, a monster will warp in. The monsters
become stronger with each turn of a page. The things that will
warp in are (in order); Kobold Captain, Sword Spider, Umberhulk,
Mind Flayer, and finally a Beholder. If you defeat all of the
monsters, turning the next page of the Tomb will reward you with
the "Ring of Free Action". Once you are
finished with the Tomb, check the side wall for a secret door.
Open it and follow the path to the Kurtulmak Crystal.
8.
You will need to kill all of the Kobolds (including the ones
that warp in). Once the Kobolds are dead, the "Kurtulmak's
Crystal Shard" will appear in your inventory (check
it). Also, you will want to loot the body of the Kobold Shaman
and locate the "Wooden Stake". Once you are
done in here, head back out the way that you came in, and then
head for location #9. You can check for items along the way,
but be careful for the group of undead that are hiding behind
the corner. One of these guys will drop the "Cleric's Staff
+3" (not a bad item, but not too great).
9.
When you reach area #9, Dace Sontan will speak with you. At
first he seams friendly, but in the end, he will attack you and
must be killed. Take him out and then use the Wooden Stake that
you found on the Kobold Shaman on Dace's coffin. This will release
Dace from his "torment", and it will allow you to take
his hand.
10.
Now you need to head back to the large stone face. Along the
way, you will be trapped by a group of 6 Umberhulks. A second
after one of your group members walks through the door near area
10, the door will close, dividing your forces. There will be 3
Umberhulks on each side of the door. It would be wise to summon
some elementals, animals, or spiders before walking through the
door. This way your mages in the rear of the party formation are
not left alone to deal with the Hulks.
11.
After you have collected the "Kurtulmak's Crystal
Shard" and "The Hand of Dace", you need to return
to the large Stone Face. Speak with him, and he will open his
mouth, allowing you to exit to Bodhi's
Gauntlet Level 2.
|