To locate the next Amateria puzzle, head down to the tracks-and-huts puzzle and walk beyond the fifth hut (away from the balance puzzle). Cross the hexagon pedestals and follow the columns until you spot an entrance to the left. It's easy to miss so rotate your view to the left often to ensure that you don't miss the doorway that leads to the next puzzle. Once you locate the doorway, approach and open the door. Approach the control panel to activate the next puzzle.
Search for this door on the left side of the path. Open the door to approach the tracks-and-wheels puzzle. |
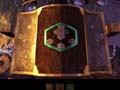
SAAVEDRO'S JOURNAL: After entering the door leading to the tracks-and-wheels control panel, pick up a page of Saavedro's journal off of the ground.
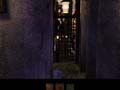
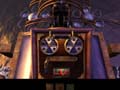
Walk up to the control panel. Pull the lever to raise the control panel in the air so you overlook the tracks and rings. There are four sets of arched tracks and two sets of wheels--each wheel has six rings: Three are open and three are closed with a spring. You must ensure that the ball survives a trip across the tracks and that the wheels end up on the upper right side of the track.
You must place the pegs in the correct holes to complete the puzzle. |
Examine the control panel. It possesses two pielike circles; a small hole rests in each pie piece. There are three pegs that you will use to place inside the small holes inside each pie piece. Depending on where the pegs are placed, the movement of the ball inside the puzzle changes. To make matters more difficult, Saavedro sabotaged the puzzle by jamming something inside one of the pie piece holes.
The pie-shaped circles represent the wheels on the main puzzle. When the ball rests inside the left wheel, both the puzzle wheel and the pie-shaped circle on the control panel turn counterclockwise. When the ball rests inside the right wheel, both the puzzle wheel and the pie-shaped circle on the control panel turn clockwise. When a peg intersects with the 6 o'clock position on the pie-shaped circle (as it's rotating), the wheel stops, and the ball launches onto the tracks and to the other wheel.
Place the pegs in this configuration, then pull the lever to start and complete the puzzle. |
To solve the puzzle, you must ensure that the ball launches successfully across the tracks and onto the other wheel--however, the ball must land on the wheel inside one of the spring-loaded rings. If the ball lands in one of the rings with no bottom, it falls into the sea, and you must restart the puzzle.
Place the other peg in the right wheel at the 10 o'clock position. Solve the puzzle by placing two pegs on the left circle and one peg in the right circle. At the control panel's initial state, you will place pegs in the 12 o'clock and 2 o'clock positions on the left wheel.
Here's the hexagon button configuration that you'll receive upon completing the tracks-and-wheels puzzle. |
With the pegs in place, pull the lever to start the puzzle. The ball will successfully cross the tracks, wheels, and reach its destination.
As a reward, you are shown a third track segment, which raises and lowers near a building (again, more on this later). The control panel closes revealing another hexagon button configuration. Make note of the hexagon button configuration--you'll need it later. Remember that hexagon console you spotted at the start of Amateria? You'll need these hexagon codes to complete that puzzle.