|


 News News

Reviews
Previews
Downloads
Screens
Movies/Media
Hints/Guides
All PC Games
Release Calendar
Top PC Games
Hardware

Action
Adventure
Driving
Puzzle
Role-Playing
Simulation
Sports
Strategy

Xbox
GameCube
PlayStation 2
Game Boy Advance
All Games

Dreamcast
Nintendo 64
PlayStation
Saturn
Game Boy Color

Forums
GameSpotting
Special Features
Beta Center
Newsletters
SuperSites

Get Complete
Free Downloads
Burn Custom CDs
Join GameCreds
Developer Zone
GameFAQs
Desslock's News
Advertise
Top 100 Searches
|
|
|

|
Third Hut: Once again, continue along the track as the ball would. Proceed out to the third hut, which is actually the second hut on the far right (if you were looking at the huts from the control panel). Walk out to the hut switch and match the design on the hut switch with the third button design on the control panel. Do so by moving the pointer to the third design from the upper left (if it were a clock, it would point to the 2 o'clock position). You have now aligned the third hut correctly!
Here's the correct switch alignment for the third hut that the ball moves through. |
Fourth Hut: Proceed along the track as the ball would. Stay right at the intersection and make your way out to the fourth hut, which is actually the second hut from the far left (if you were looking at the huts from the control panel). Walk out to the hut switch and match the design on the hut switch with the fourth button design on the control panel. Do so by moving the pointer to the fourth design from the upper left (if it were a clock, it would point to the 4 o'clock position). You have now aligned the fourth hut correctly!
Here's the correct switch alignment for the fourth hut that the ball moves through. |
Fifth Hut: Follow the track again as the ball would and reach the fifth hut, which is actually the farthest hut on the right (if you were looking at the huts from the control panel). Walk out to the hut switch and match the design on the hut switch with the fifth button design on the control panel. Do so by moving the pointer to the fifth design from the upper left (if it were a clock, it would point to the 6 o'clock position). You have now aligned the fifth hut correctly!
Here's a recap. If you simply went from the farthest left hut to the farthest right hut and adjusted all the pointers on the hut switches, here are the positions of the pointers:
Here's the correct switch alignment for the fifth hut that the ball moves through. |
Farthest Left Hut (second hut the ball moves through): 12 o'clock
Second Hut from the Left (fourth hut the ball moves through): 4 o'clock
Middle Hut (first hut the ball moves through): 10 o'clock
Second Hut from the Right (third hut the ball moves through): 2 o'clock
Farthest Right Hut (fifth hut the ball moves through): 6 o'clock
With all hut switches aligned correctly, return to the control panel by backtracking off the track, through Saavedro's painting area, and up the ladder to the control panel. Use the control panel to drop a ball onto the track.
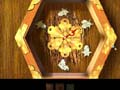
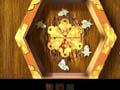
Here's the hexagon button configuration you receive upon completing the tracks-and-huts puzzle. |
If aligned correctly, the ball will move through all five huts (watch the control panel buttons as the ball moves) and survive intact.
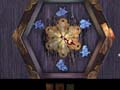
As a reward, you are shown a second track segment, which raises and lowers, near a building (again, more on this later). The control panel closes, revealing another hexagon button configuration. Make note of the hexagon button configuration--you'll need it later. Remember that hexagon console you spotted at the start of Amateria? You'll need these hexagon codes to complete that puzzle.
|
|