 |
|
| |
The Tracks and Huts Puzzle The next Amateria puzzle comes in two parts: the tracks and the control panel. Head toward the control panel first. Exit the balance-puzzle control panel to the right and return to the tunnel containing the elevator--this is the lift you used to check out the composition of the weight. Continue beyond the elevator and spot a makeshift ladder on your right. Ascend the ladder and cross the platform to the control panel--it overlooks a set of tracks and huts, the location of the next puzzle. The Control Panel: Before heading down to the tracks, you should examine the control panel carefully and attempt to discern how the control panel operates in conjunction with the puzzle. First, though, raise the control panel by turning left and pulling the lever on the panel's left side. This raises you high in the air and provides an excellent view of the tracks and huts below. You'll notice five huts in a semicircle around a central hut. SAAVEDRO'S JOURNAL: Examine the area around the control panel for the tracks-and-huts puzzle on another page of Saavedro's journal.
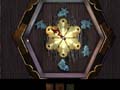
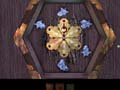
Pull the lever just left of the panel to restart the puzzle. Instead of looking at the tracks, though, look at the control panel. Watch how a ball appears on the control panel and moves across five different buttons. As soon as it hits the first button, the real ball shatters. Apparently there's some correlation between the buttons on the control panel and the huts below. Make note of the designs on the control panel around each button--they come into play in just a moment! Make sure you note the order of the design. For instance, the way the buttons are numbered from left to right--note which design fits with which numbered button. The Tracks: To solve the puzzle, you must now maneuver down to the tracks and huts below. With the control panel designs (numbered) noted, descend from the control panel and down the ladder. Head right, move through the cave (note Saavedro's painting), and proceed through the walkway to the tracks ahead. You're now on the tracks-and-hut formation you saw from the control panel a moment ago. It's time to be the ball! As you recall, the ball dropped down onto the tracks and headed toward the middle hut first. Therefore, follow the track to the central building then proceed toward the middle hut, just as the ball wood. When you reach the hut, as the track turns, you will notice a platform just over the water. Walk out onto the platform and notice the switch on the beam to the right. Examine the switch closely.
First Hut: So, to align this hut correctly, you must match the design on the control panel with the design on the hut switch. Adjust the pointer until it points to the first design on the upper left side (if it were a clock, it would point to the 10 o'clock position). You have now aligned the first hut correctly!
|


| News |
All Games |
PC |
Xbox |
PS2 |
GC |
GBA |
DC |
N64 |
PS |
Saturn |
GBC |
Hardware |
Forums |
GSLive | |
|
Help |
Worldwide |
About Us |
Advertise on GameSpot |
Join GameSpot Complete |
Shop for Games | |
| CNET Networks: Builder | CNET | GameSpot | mySimon | TechRepublic | ZDNet | About CNET Networks |