|
| GAMESPOT.COM | PC GAMES | VIDEO GAMES | PC HARDWARE | GAMESPOT LIVE | GAMEBUYER |
| ||
PC GAMES News Reviews Previews Movies/Media Downloads Hints/Codes GameGuides.com Special Features Beta Center Release Calendar Forums Top Games
PC GENRES |

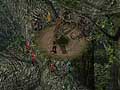
Once you reach the palace, click on the tree inside until you get all the nuts from it that you can. There are two types here: four inedible nuts that will serve a use in the next section of the game and four edible nuts that will act as healing potions when used. You should have your main character place these in one of his quick-slots, as they're even more powerful than extra healing potions. Proceed through the door, then click on the two statues to stop the flow of water, revealing a staircase.
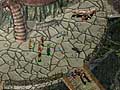
You're now on the lower level of the tree of life. You must find the three parasites that Ellesime tells you of and destroy them. They're scattered about the level; you can see their positions on the map. When you click on them, two normal elementals will appear to guard them. You shouldn't have much trouble with a simple enemy like this at this stage of the game. Once you manage to destroy all three parasites, you'll immediately be warped to fight Irenicus, so be sure to heal or rest before you destroy the third creature and certainly save your game.
Hell Hell is an area that contains five different tests that you must undergo before heading to the final battle. Walk west to the test of wrath first. You must fight Sarevok, but you can choose to either give in to your anger or not. Assuming your character is good, choose not to (generally the first choice in the conversation menus). Sarevok is probably the toughest melee fighter you'll see in the game, possessing many hundreds of hit points, but he won't use any spells at all, so use that to your advantage by having your mages sit back and pelt him with spells. When he dies, you'll get the first tear of Bhaal. You can rest in the main area of this level without fear of being disturbed. South of wrath is the test of greed. This is a fairly simple one for good characters. Take the blackrazor from the demon and give it to the djinni to earn the second tear of Bhaal and 20,000 experience points. To the south of the main area of hell is the test of selfishness. This is one of the more frustrating tests; when you head through the left door (which is the good path), your character will lose two hit points (permanently), one point of dexterity, and experience. On the other hand, proceeding through the evil path results in the trapped character's death, so you must suck it up and take the loss. Nobody said being a good guy was going to be easy. The southeastern test is the test of fear. You're given the choice between accepting the cloak of bravery or attempting to pass through the cavern on your own. Reject the offer and cast resist fear on yourself. Head through the lower portion of the cave and pick up the tear of Bhaal. If you head to the northern end of the cave, the elder orbs and gauths will kill you, so be careful. The final test to the east is the test of pride. Keep questioning the demon and be sure to refuse killing a creature simply because it is "in your way." You can avoid the fight this way, and a dragon will give you the final tear of Bhaal.
|
| ||||||||||||||||||||||||
| ||||||