|
| GAMESPOT.COM | PC GAMES | VIDEO GAMES | PC HARDWARE | GAMESPOT LIVE | GAMEBUYER |
| ||
PC GAMES News Reviews Previews Movies/Media Downloads Hints/Codes GameGuides.com Special Features Beta Center Release Calendar Forums Top Games
PC GENRES |
Baldur's Gate II is a long game, and you're bound to get stuck somewhere along the way. Enter our walk-through. This is not an exhaustive guide to everything you can possibly do within the game - that size walk-through would be thousands of pages. Rather, it is a guide that will take you through the travels, quests, and battles necessary to complete the game. It's especially important to realize that your choice of NPCs will affect how the game plays. If you choose not to let an evil character join your party, for example, you may be missing a mini-quest that only an NPC can attempt. This walk-through is intended to be generic in the sense that it will rarely matter what specific NPCs are in your party, but some specific NPC quests will be covered. These will be noted as such, so feel free to skip those sections if you wish. This walk-through, in general, will be most useful to parties of prominently good or neutral alignments; evil characters will want to make proper role-playing choices where they are available (not rescuing slaves, being cruel in conversation, and so on). This shouldn't have too great of an impact on the game, though you may find yourself performing some tasks a bit differently than is outlined here. Reading this section straight through is not recommended, as it will give away many of the game's surprises, and what fun is that? Refer to the walk-through as needed, using it for advice on how to get past that evil sorcerer you just can't beat or for a clue on what to do to open that secret door. Following this part of the guide word-for-word will not only drain most of the fun out of the game, it'll take all the role-playing out as well. You'll go through the journey, missing most of the sub-quests and playing the way we would play. Only use this if you get stuck or need some advice!
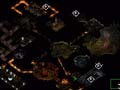
You begin the game in a holding cell, where an unknown wizard is keeping you hostage. Sit through the opening in-game cinematic for a minute until Imoen comes to rescue you. Once she talks to you, join her group and head to the northeast. Imoen is a mage/thief, and she'll be doing most of the trap detecting duties for your party. She can use a dagger, but since she doesn't wear armor, you might want to equip her with one of the short bows you'll find in your journey. To the northeast, you'll see two holding cells. Speak to Minsc first and insult him until he becomes enraged enough to break out of his cell. Minsc is a ranger and a fierce warrior in battle. He has specialties in a number of weapons, the most prominent being two-handed swords and two-weapon style. You're probably better off giving him a two-handed sword at this point in the game; it will help you take out many of the enemies much more quickly. Head up to talk to Jaheira, who's stuck in a cage that needs a magical key to be opened. You'll find said key in a room to the northwest. Don't worry; the golem in here isn't dangerous. Search the table and the chest for equipment for your three characters and make sure you find the key in the chest. Have Imoen detect traps and click on the painting near the chest. (As a note, it's typically a good idea to have a thief set to detect traps whenever you're adventuring through hostile territory.) She'll detect the trap and can unlock the painting to reveal a dagger +1 and a few healing potions. Head back to Jaheira and set her free. Jaheira is a fighter/druid that can change shape into various animals. She's not an overwhelmingly powerful presence in melee combat, and she has a fairly low hit-point total in relation to the other characters, so you might want to keep her out of harm's way if you are a warrior character. Once she's in your party, head back to the equipment room and find some equipment for her. Don't bother heading out the door in this room; there's only a locked door on the other side. Head to the south and into the corridor with the dead bodies. You'll come around a corner where you'll encounter a large machine that will spawn lightning mephits. There's a switch on the wall, so get close to it and hit it to prevent more mephits from popping out. You must fight at least one, but they're not very tough to kill.
|
| ||||||||||||||||||||||
| ||||||