|
After
accepting the quest for Adalon, your next venture is to enter the Drow
city of Ust Natha. You will be entering under the guise of Dark Elves
(Drow). The main thing to remember is that if you are caught or
discovered, you will be reloading your game soon enough. For this
reason, I will suggest that you make a permanent saved game before you
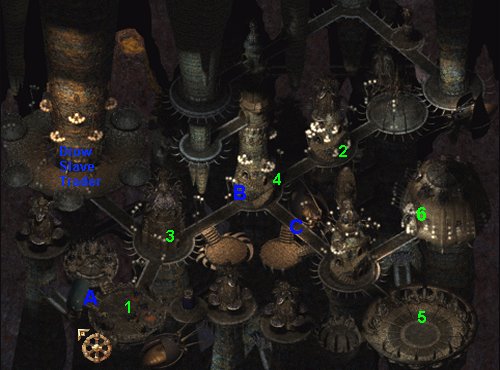
enter the city, and another save after each major step. 1.
Main Platform - When you enter the Drow City, you will find yourself
in a small Market area. There are a few Merchants that you can trade
items with, and maybe buy a few as well. One thing to keep in mind is
that items bought from the Drow will disappear from your inventory when
you complete this area and return to the surface. For that reason, be
careful of what you buy. As the Drow guarding the gates told you, from
here you should head to the "Male Fighters Society" (which is
marked as location #2 on your map). Djinn
Torture: Along the way, you may encounter a few locals who are doing
their Dark Elvish routine. You will see a group of mages torturing
a Djinn. If you choose to get involved, know this... You will gain
nothing, but you will lose 2000-4000 gold, or you may run the risk of
blowing your cover. It is best if you just turn your head and
continued on your way. 2.
Male Fighters Society - Locate the Male Fighters Society
building, and speak with Solavfein. He will send you back to the Main
Platform (area #1) to speak with the Handmaiden Imrae. Meeting
the Handmaiden: Imrae will tell you about the kidnapping of the
Handmaidens daughter, and then she will ask you to go rescue her. You
will need to meet Solavfein near the Illithid Tunnels in the Underdark
area within 12 hours... No less. Check the clock if you must, but do not
be late for this (or any event during this chapter). Ambush:
Along the way to meet Solavfein at the entrance to the Illithid Tunnels, you will be
attacked by a very powerful group of mixed classes and races. You should
plan ahead for this fight (save your game also). Rescuing
Phaere: When you arrive near the Illithid Tunnels, speak with
Solavfein. Shortly after, a group of Mind Flayers and Umber Hulks will
attack. You will need to Kill the Mind Flayers, and save the Drow named
Phaere [Note: you do not actually enter the Illithid
Tunnels]. Once that is done, you will be told to meet Imrae back at the
main platform. Imrae
will direct you towards Phaere at the Tavern. 3.
Tavern - As Imrae told you, head for the Tavern and speak again with
Phaere. After a little dialogue, she will re-direct you back to the Main
Platform, where you are to speak with her again (tired of the back and
forth yet? hehe, well it gets worse). However, before you rush off, you
may as well check out the Tavern a little. Monster
Pit Fight: Speak with Szordrin in the Tavern, and he will question
your abilities, trying to talk you into fighting in his pit. Save your
game before doing so, but then go ahead and accept. You will be pitched
against 4 different monsters each time you speak with Szordrin. Each
monster will increase in difficulty. First, you will fight a lowly Umber
Hulk. Winning this fight will award you 250 gold. The second monster is
a Nabassu (small Demon). Winning this fight is worth 500g. The third
fight will be against a Sahuagin Prince, and the reward will be 750
gold. The final fight will be against a Beholder. I suggest that you
save the game before the final fight (this beholder likes to cast the
"Imprisonment" spell). You will win 1000 gold for this fight.
[Note: you can take your entire party into this arena to fight... it
does not need to be a one-on-one fight). Duel
Arena: Speak with the Drow in charge of the arena, and he will tell
you about the next match. Tell him that you would like to watch, and
that you may want to fight the winner. After Lasaonar wins his match, he
will speak with you. Tell him that he fought children (or something like
that), and then he will challenge you. Speak with the arena boss again,
and then select who will fight against Lasaonar. Unlike the Monster Pit,
the fights in the Duel Arena will be "one-on-one". When you
kill Lasaonar, you will gain 30,000 exp, and then Chalinthra will challenge
you. Tell the Arena boss that you accept the challenge, and then pick
who will fight. Taking out Chalinthra will gain you 12,000 exp. You can
now request more fights from the Arena Boss, but you must choose a mage
class to do the fighting (duel-classes are welcome). You will fight up to
3 Drow Mages. You will gain 6000, 8000, and 11,000 exp for fighting all
3. 4.
Female Fighter's Society and Qilue's Home - On your way back to
speak with Phaere, you may encounter a Duergar (located at the Main
Platform / Area #1). He tells you that his master would like to speak
with you. His master happens to be the large aquatic creature inside the
aquarium that is behind him. You can ignore him, or you can speak with
his master (you will need to click on the fish tank to speak). Aboleth
will then communicate telepathically with you. He tells you that he
knows who you are, and that he will expose you unless you do something
for him. Aboleth wants you to retrieve the "Brain of Qilue"
for him. You will need to go to area #4 and kill Qilue for the brain.
When you return with the brain, Aboleth will take it, and then award you
with nothing at all. For an alternative to this quest, you could just
ignore the requests to speak with Aboleth, or you could tell Aboleth
that you would expose his plans if he exposed yours. Either way, you can
easily avoid this meaningless task. 5.
Southwest Platform: When you leave the Tavern, you need to return
to the Main Platform (Area #1) and speak with Phaere. She will tell you
about an "Eye Tyrant" (Beholder) who has been smuggling
Adamantine from the city. The Beholders Ship if off of the Southwest
Platform (#5 on map). You will need to meet Phaere and Solavfein there
and help them kill it. When you do this, you will gain 20,000 exp, and
Phaere will drop a few suspicious clues that would indicate that the
Beholder is to be used for other reasons. Phaere will then tell you to
meet her back in the Tavern within 3 days time (no less). Meet
Phaere back at the tavern: When you speak with her at the Main
Platform, Phaere will tell you to go and teach the Svirfneblin a lesson
in fear. Accept her request (keeping in mind that you need not go
through with it), and then head for the Svirfneblin town in the
Underdark area... Solavfein
Patrol: [Note: if you glance through
this section, it is easy to confuse Solavfein with Svirfneblin. To cut
down on confusion, I have colored each of these two names for this
section only.] Just before you reach the small Gnomish settlement, you will
find Solavfein waiting for you. Speak with him to learn of the details.
Now, if you want to be evil, you could kill the Svirfneblin as
requested. However, the main plot points you towards a non-violent
approach. When you speak with Solavfein, tell him that you can handle
the situation and that he should return to the city. He will be pleased
to do so. When
the Svirfneblin patrol passes through, tell the leader that you were
sent to kill him, but you will not do it. He will be happy to give you
his "Svirfneblin Leader helmet" to take back to Phaere as proof. This is
the "good guy" way to do things, and you will not "burn
any bridges" with this path. Return
to Phaere: Return the Helmet to Phaere inside the tavern, and then
she will tell you to meet her inside her private quarters inside the
Female Fighter's Society in no longer then 1 hour. Phaere's
Private Quarters: Phaere will be waiting for you in her private
quarters inside the Female Fighter's Society (located at location #4 on
the map). Phaere will order you to kill Solavfein, who can be located
inside the "Male Fighters Society" (location 2). You have
3
days to do this task. Kill
Solavfein: You will need to enter inside the building to speak with
him. Now you have another choice to make. For the good-guy, and
the safest path, you should tell Solavfein about Phaere's plan, and then
request that he hand you his "Piwawfi Cloak". Solavfein will
go along with your plans, and he will assist you on a mission later. To
play "evil-guy", you could go ahead and kill Solavfein, but it
will make your life very difficult in the nearing future. Either way
that you choose, get Solavfein's Cloak, and then return it to
Phaere. When
you hand the Cloak over to Phaere, (if your main character is a male)
she will then order you into her bed with her. The safest thing to do is
to hop in, but if you have a romance going on with any member of your
party, they will become upset. You will have to deal with that on your
own (I just wanted to give you a "heads up"). When you wake,
Phaere will tell you to meet her and Matron Mother Ardulace inside the
Temple of Lolth. You must go directly there (do nothing else, but head
for the Temple). 6.
Temple of Lolth - Inside the Temple, the Matron Mother Ardulace will
tell you of the mistake with the first "Eye Tyrant". It turns
out, that Beholder was not the correct type. She will then give you 3
options which you can follow. You must choose at least one...
A.
Recover the Blood of an Elder Orb (from the Eye Tyrant Tunnels in the
Underdark main cavern). B.
Recover the Blood of an Elder Brain (from the Illithid Tunnels in the
Underdark main cavern). C.
Recover the Blood of the Prince of the Kuo-Toa (from the Kuo-Toa Tunnels
in the Underdark main cavern).
Again... You
do not need to do all 3 of these. If you want to, for the sake of doing
everything, then go right ahead. As for the difficulty of each area... Well I think that the Kuo-Toa area is the easiest "area". The Eye Tyrant Tunnels are easier for the fact that all that
you "must" do is step inside, kill something and then exit
(though, you can explore around if you like). The Illithid Tunnels area is the
most involved (and most difficult). You will need to solve puzzles and mini-quests
in order to complete your task. You should choose an area that you feel
like you can handle. Scan a little of each of the 3 area walkthroughs (Kuo-Toa
Tunnels, Eye
Tyrant Tunnels, and Illithid
Tunnels) and see which one seams like the best one for you. Once
you have the "Blood" of one of the 3 requested monsters, return and speak with the Matron Mother again. She will begin her
ritual, and tell you that you can rest. However, before you can take the
Matron Mother up on her offer, Phaere demands that you see her inside
her personal quarters in no more then 1 hour. Head
on over to the Female Fighters Society, and speak with Phaere. She will
ask you to betray the Matron Mother by swapping the real Dragon Eggs
with fake ones. Agree to do this. Phaere will give you the "Despana
Treasury Key" and a set of "Fake Dragon Eggs (Phaere's)".
She tells you to sneak into the Treasury (located in the rear of the
Temple), exchange her Fake Eggs with the Real Eggs, and then return the
Real Eggs to her. Just
before you get to the door of the Temple, Solavfein will warp in and
offer you a second set of "Fake Dragon Eggs (Solavfein)".
He wants you to swap Phaere's Fake Eggs for the Real Eggs, but instead
of giving the Real Eggs to Phaere, give her the second set of Fake Eggs
(Solavfein's version). Agree to do this. This is the
only way to save the Silver Dragons Eggs. If you decline Solavfeins
offer, and continue through with Phaere's plan, you will be following
the "evil" path. The evil path requires you to fight Adalon
(instead of helping her). [Note:
I should mention here that if you killed Solavfein when Phaere asked you
too, then you will be unable to swap Eggs around as mentioned. You can
continue the game, but you will need to fight everything to do it (which
is very difficult to do).] Once
you have exchanged the Real Eggs for Phaere's Fake Eggs, return to see
her at the Female Fighters Society. Give her Solavfein's Fake Eggs, and
then she will warp away, telling you to follow her to the Temple. Just
after Phaere vanishes, the Silver Dragons Imp will warp in and speak a
bunch of "rubbish". Basically, he tells you that the City is
magically sealed shut, and the only way to exit is for the Matron Mother
to die. Return
to the Temple... The Matron Mothers ritual will begin. Phaere, the
Matron Mother, and your group will all gather in a small room. The
Matron Mother will then summon her Demon. She will offer the Eggs, and the
Demon will see that they are fake. For trying to deceive him, he kills
the Matron Mother. At that point, Phaere steps up with her version of
the Eggs. Again, the Demon will see that the Eggs are fakes. He will
then kill Phaere for trying to pull one over on him.
Finally, the Demon asks if anyone has any Dragon Eggs. You can remain
silent, you can tell him that those who have summoned him have been
slain, or you can speak up and give him the real eggs (This option is
evil... Explore this choice at your own risk). At this point, the Demon returns
to which he came, and you must
make your escape. Before you do, loot the items that the Matron Mother
and Phaere dropped. You will find the "Gorgon Plate +4",
the "Drow Piwafwi Cloak", the False Dragon Eggs, and a
"Ring of Spell Turning" (Plus 3500+ gold and a lot of
gems). Now,
you need to exit the Drow City. Return to the Underdark, enter the
Lair of Adalon, and give her the Eggs. Adalon will then transport you to the second area in the
Kuo-Toa Tunnels (see the Kuo-Toa
walkthrough for an image). You will need to fight off the group of Drow
standing by the door (Adalon will help you) unless you already did so
while you were here collecting the Princes Blood (if you choose that
path). Enter the second area, continuing to fight off the Drow. Work
your way to the surface, and that is the end of Chapter 5. [Note:
If you gave Adalons Eggs to the Matron Mother, Phaere, or the Demon,
Adalon will attack you.] See
the Walkthrough Main
menu for Chapter 6.
|