 |
|
| |
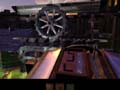
The Balance Puzzle You've reached the first Amateria puzzle, which we will call the balance puzzle. Before you start on the solution, it's wise to always experiment with the puzzle controls to get an idea about what's happening in front of you. The control panel both initiates the puzzle and sets the position of the balance, specifically the balance's fulcrum. For instance, moving the top two levers toward the left and the bottom lever toward the right, places the fulcrum to the far left. Moving the top lever toward the left, the middle lever toward the right, and the bottom lever toward the left, places the fulcrum in the middle. Finally, moving the top lever toward the right and the bottom two levers toward the left sets the fulcrum to the far right. You can use the lever on the right side of the console to start the puzzle. When you use the right side lever, a ball forms above the balance and drops inside. Another sphere (appears to be wooden as well as crystal) drops into the weight. For the ball to get across, you must correctly balance the sphere with the balance mechanism. You'll notice that in its current state, the ball that appears and attempts to move across the balance will never make it across--it shatters into pieces no matter the balance settings.
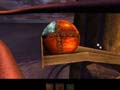
1. The Weight: First, it's important to discover the composition of the weight or the wood-crystal combination ball that drops down onto the balance after initiating the puzzle. To do so requires a bit of backtracking. Hop off of the console and head right back toward the Amateria start position. As you cross the bridges, look for a small, dark hallway to your left. Enter this hallway and spot a lift on the left. Ride the lift to the top and rotate your view until you spot the weight. Look closely at the weight. Notice that from this position it appears to be made of one piece crystal and three pieces wood. However, that's only half of the ball! You must spot the other half to discover the entire composition. SAAVEDRO'S JOURNAL: You'll find a page of Saavedro's journal at the top of the elevator where you've examined the composition of the weight. Return to the balance-puzzle console. Stand on the console and pull the lever on the left. This raises the console higher into the air and provides a good view of the balance puzzle--and more importantly, the weight! From this angle, you can see the other side of the weight: It's made up of four sections of wood.
2. The Counterweight: For the balance to operate correctly, the counterweight needs to be properly configured. From the balance-puzzle console, head left along the path and discover a small room on the left side of the puzzle. Enter this room and spot a large weight in the center. It's made up of half wood and half open slate. You must put the proper amount of weight on the counterweight to balance the multimaterial ball. Thorough examination of the counterweight room reveals several wedges: You'll find metal, wood, and crystal wedges, each of which can be placed on the counterweight in an attempt to balance the puzzle. Unfortunately, you will also notice broken pieces of these wedges around the room. Apparently Saavedro had a little fun here and sabotaged the puzzle's original design.
So you won't be able to create a perfect counterbalance to match the multimaterial ball--there are only two wood wedges available, and you need three! So, instead of creating the exact balance, think proportion! It's possible to create a counterweight that's double the weight of the multimaterial ball.
|
| News |
All Games |
PC |
Xbox |
PS2 |
GC |
GBA |
DC |
N64 |
PS |
Saturn |
GBC |
Hardware |
Forums |
GSLive | |
|
Help |
Worldwide |
About Us |
Advertise on GameSpot |
Join GameSpot Complete |
Shop for Games | |
| CNET Networks: Builder | CNET | GameSpot | mySimon | TechRepublic | ZDNet | About CNET Networks |