 |
|
| |
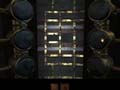
The Electromagnet Puzzle Follow the tunnel to the previously locked door at the end. Examine the door closely and notice the blue light shining within the handle--looks like it does have power! Click on the door to open it; walk inside and locate a ladder leading down. Descend the ladder into another room. Look left to spot some sort of video screen. Approach and click on the button beneath the video screen to trigger a message from Saavedro. The message content depends on whether you are tackling Voltaic as the first, middle, or third age. Continue down the corridor and enter the chamber. You spot a large cylinder in the middle of the room below you. This cylinder is actually an electromagnet that serves to power much of Voltaic. As you descend the ladder into the chamber and examine the electromagnetic cylinder more closely, you'll discover that there are five circuit panels visible around the cylinder. It appears the circuits are broken--you need to mend the circuits to power the rest of Voltaic! SAAVEDRO'S JOURNAL: Search the room around the magnetic cylinder for a page from Saavedro's journal. Before you start turning circuits, move around the cylinder and spot the other four panels. What makes the puzzle difficult is that you aren't trying to simply mend the circuits on each panel--you must make sure the circuits are connected on all panels. Just because you manage to connect the circuits on one panel doesn't mean the circuits will be connected on another panel.
Now you only have to connect the middle row. If you have completed both the top and middle rows, simply rotate the middle row until the electromagnetic cylinder powers up--a cutscene should interrupt your circuit connecting to let you know that the puzzle is complete. When done, retrace your steps back to the ladder and ascend. Return to the power generator room (with the diagram) and notice that more icons have lit up. There's only one icon not powered--you still have much to do! Proceeding to the Ship From the power generator diagram, return through the blue-lit corridor and proceed right at the intersection into the red-lit corridor (you're moving away from the age's start position). Continue through the corridor until you are outside overlooking a large chasm. Keep moving across the catwalk. There's an opportunity to turn right to an elevator, but you don't need to move there quite yet. Keep moving forward along the walkway until you enter what appears to be a dock for a large airship. Descend the ladder at the end of the walkway. Follow the walkway to the right and notice a set of valves and a large gauge. You can fiddle with these valves now, but you won't make progress--apparently it's not operational just yet. Just beyond the valve system you'll find a ladder; ascend the ladder up to a staircase. Keep moving forward and reach some sort of maintenance hatch. Since it connects near the valve system, perhaps it has something to do with supplying the air to the valves and the ship! SAAVEDRO'S JOURNAL: Find another page from Saavedro's journal at the top of the ladder just before you cross the large pipe.
Open the hatch and crawl through and onto the large pipe that spans the chasm. Cross the chasm and reach the hatch on the other side. Open the hatch and crawl through the shaft until you are on top of a grate (if you miss the grate, the shaft eventually dead-ends). Open the grate and drop into the room below.
|


| News |
All Games |
PC |
Xbox |
PS2 |
GC |
GBA |
DC |
N64 |
PS |
Saturn |
GBC |
Hardware |
Forums |
GSLive | |
|
Help |
Worldwide |
About Us |
Advertise on GameSpot |
Join GameSpot Complete |
Shop for Games | |
| CNET Networks: Builder | CNET | GameSpot | mySimon | TechRepublic | ZDNet | About CNET Networks |