|
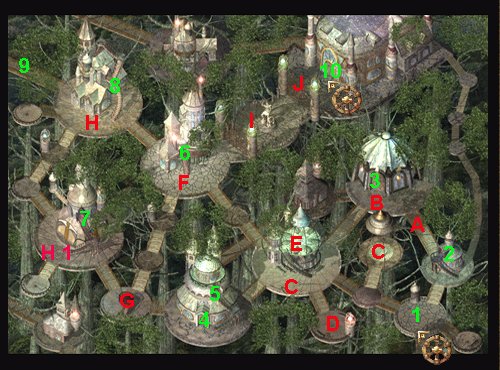
First off, let
me explain the red letters on the map... For this area, you will need to
explore the City. While doing so, you will encounter quite a few hostile
situations. The red letters on the map point out each of them. Check at
the very bottom of this page for the details of the "Red"
encounters.
When you enter
the Elven City of Suldanesslar, you will be briefed by Elhan. After the
short conversation, you should know that you need to locate Demin and
Ellesime.
1.
Elhan: You will meet Elhan when you first enter the area. He will
tell you that you must find Demin and Ellesime if you wish to stop Irenicus.
2.
House of the Horn: Enter the house north of your starting location.
Watch out for the monster at location [A].
Enter the House, and kill the 3 Stone Golems. In doing this, you will
save the Captured Elves. These Elves will tell you that Demin was last
seen in the SW corner of the City. Before you leave, check the room for
items. You should find the "Cloak of the Elvenkind" and
the "Stone Horn". You will need the Stone Horn to
continue with the game, so be sure to grab it.
3.
Temple of Rillifane: You can skip the Temple for now, or you can go
ahead and clear it so that you will have less to deal with later. Inside
the Temple, you will need to kill Suneer, an Iron Golem, a Rakshasa, and
a Glabrezu. This is not all that easy of a fight. Suneer should be your
first target to attack when you enter this Temple. While you are here,
you will notice that the statue in the center of the room is actually an
Alter. You need to gather 3 items and then place them here... That will
come later.
4.
House of the Talisman: Inside this house, you will find a strangely
locked Elven Chest. To access the Chest, you will first need to enter
the Priest's House and find the "Elven Priest's Stone".
5.
The Priest's House: Enter this house and grab the Elven Priest's
Stone. This stone will tell you the "The natural Order".
Return to the "House of the Talisman" and click on the Elven
Chest. You will be asked to choose the correct order. By reading the
Priest's Stone, you should know that the order is as follows:
1.
Corellan Lotharian
2.
Rillifane
3.
Symbol of Water
4. Tree
of Life
5. Rune
of Suldanessellar
After entering
the correct order, you will gain the "Talisman of Rillifane".
6.
House of the Moon: When you enter this house, an Elven Warrior will
slay a Balor by using the Blade of the Moon. After this happens, you
simply need to walk over and pick the "Moonblade" up
off of the Elven Warriors corpse. Also, grab the "Elven Chain
Mail". This armor may not seam too great at first glance, but
the power of it is that it will allow a multiclass mage to wear armor.
Imoen is a great example. If she wears normal Chain Mail, her Wizard
Spells would be disabled. While wearing this Elven Chain Mail, she will
be able to cast all of her Wizard Spells as well. Aerie can also wear
this armor, allowing her to have good AC and cast both categories of
spells.
Before you exit the room, check the
drawers and the shelves. You will find the "Boots of Elvenkind".
7.
Demin's House: When you enter Demin's house, you will find her under
attack from a Rajah, a Rakshasa, and a Adsaan. Defeat them, and then
speak with Demin. She will tell you what you must do to enter the
Palace. Basically, you need to locate the "Moodblade", the
"Talisman of Rillifane" and the "Golden Goblet of Life".
You should already have 2 of these items (if you have been following the
walkthrough).
8.
The Harpist"s House: Enter this house and search around until
you find the "Stone Harp".
9.
Golden Goblet of Life: At location #9 you will find a path
leading out of the Elven City. This path will lead you directly to
Irenicuses Black Dragon, named "Nizidramanii`yt". You do have 2
choices as for how to deal with him. If you word your dialogue just
right, you will be able to give the Dragon everything that you own (all
of your items) in exchange for the "Golden Goblet of Life". Or
you can kill him for it. Killing him is probably your best choice. In
the event that you find yourself unable to defeat the Dragon, you can
drop all of your stuff onto the ground and then speak with him (you may
want to make a back up save game just incase). When you talk to the
Dragon, he will take only what you actually have in your inventory, and
he will ignore the items on the ground. This is an easy way of getting
around giving him all of your items, and without having to break a sweat
by fighting.
Anyway, defeat
the Dragon (you know what I mean) and then grab the "Golden
Goblet of Life". If you kill the Black Dragon, he will drop the "Bladesinger
Chain +4".
10.
Entering
the Palace: To enter the Palace, you will need to return to the Temple
of Rillifane. Walk up to the Statue that is in the center of the room.
Place the 3 items that Demin told you to inside the statue. These items
are:
1.
Talisman of Rillifane
2.
Moonblade
3.
Golden Goblet of Life
After placing
these items, the "Avatar of Rillifane" will show up and begin
speaking with you. He gives you the "Staff of the Woodlands +4"
and then agrees to open the doors to the Palace. Once this happens, you
need to return to the Palace and enter it.
Inside
the Palace: Inside the palace, you will find a tree with
several pieces of fruit hanging from it. Click the tree a couple of
times and then the Nuts will fall off of it. You will gain 8 "Tree
of Life Nuts". Four of these nuts can be used to heal yourself, and
four of these nuts will be used in order to continue with the game. Once
you have the nuts, head for the next room. You will see 2 waterfalls
leading into a small pool of water. Nearby, there is a Statue of two
elves standing back to back. Click on each of the Elves of this Statue
to return the "Stone Harp" and the "Stone Horn".
This will stop the flow of water which is filling the pool in the center
of the room. You will then be able to go down the stairs and enter the
"Tree of Life".
[A]
Iron Golem.
[B]
Two Rajah and Three Maharajah.
[C]
Two Stone Golems and one Adamantite Golem.
[D]
Elven Warriors fighting 3 Trolls.
[E]
A Boy and a Girl. You should tell them where they can find safety.
[F]
Three Elven Mages fighting off four Rakshasa.
[G]
Elven Warriors being attacked by 3 Undead.
[H]
Two Stone and Two Iron Golems.
[H1]
A Raamilat and a Nabassu.
[ I
] Captain Advo`on, Reirra, and 2 wounded Elven. This group of Elves will
help you all that they can. This includes healing spells (and selling
you items if you have spoken with the Avatar).
[J]
Elven Warriros fighting a Balor.
|