|
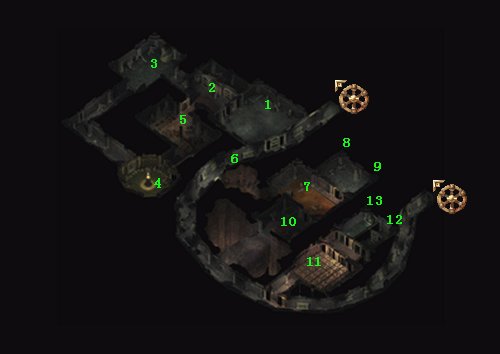
This area is
pretty straight forward. There are a few things that you will need to
pay attention to, but at least the area isn't confusing.
(1)
Begin by entering the first room that you come to. Search around until
you locate "Amuana's Bones". (2)
Continue to the next room and kill the Shadow Jailer. Loot the "Shadow
Prison Key" from his body and use it to unlock the prison
cells. Mazzy Fenton will be inside one cell and inside the other
cell you can pick up the Tombelthen's Journal (2nd half). Mazzy
will request to join your party, and she will give you the details of
the area. (3)
Continue further, and you should locate a statue that you can speak
with. The statue will ask you to perform a Ritual of sorts. You can pick
away at the options until you get it right, or you can scavenge the area
looking for the Ritual Pieces. To my experience, the dialogue options do
change (or I would simply give you the answers). However here is are a
few clues:
["Pray to the light", "Hold high
the Holy Book", "I shall reflect"] ["Sing a Hyme", "Raise my
hands", "Rejoice as Light reigns over Darkness"] ["Recite the Tenets of Faith",
"Hold high our Children", "Morn the passing of the
light"]
Once you have correctly
performed the Ritual, you will be rewarded with the "Sun Ray
Symbol". (4)
Grab the Sun Gem from the Pedestal (after it kills the attacking
shadows). (5)
Grab the "Morn Ritual" from the pillar in the center of
the next room. If you have already guessed out the Ritual with the
statue, you will find no use for the Morn Ritual, Noontide Ritual, or
the Dusk Ritual. (6)
Once you have the Sun Gem, you will be able to break the "Door of
Darkness" that blocks the main path. (7)
Cross over the burning floor (check the debris on the floor for the
"Pearly White Loun Stone" (acts as a Helm)), and step
onto the safe spot. Check the wall for a few items, but be careful of
the trap. (8/9)
Check rooms 8 and 9 for items (watch out for the
trap). You will find
the "Tomb of Amaunator" and the "Noontide
Ritual". (10)
When you enter room #10, you will meet "Badon's Ghost". He
will ask for the Bones that you found earlier, and you will be rewarded
with "Dawn's Light Symbol" and the "Shadow
Dragon Ward Stone". (11)
At location 11, you will need to step on the letters to spell out the
name of the Lord. If you step incorrectly, you will be set on fire.
Start at the far right hand side on the floor, and step on squares that
spell out:
"[A] [M] [A]
[U] [N] [A] [T] [O] [R]"
(12)
Once you have crossed the "Amaunator Floor", enter room
#12
and speak with the Shadow. It seams as if he is stuck and would like to
follow you back across the trapped floor. Do not agree to help him.
Instead just kill him where he stands. Loot his body for some really
nice boots. Check the back of the room (in the Shadows hiding spot) for
the "Symbol of Amaunator". (13)
Before you cross back over the Amaunator Floor, check room #13. There is
a statue with its hands out. It is hard to point your cursor just right,
but you can grab a few high level spells, and the "Arla's
Dragonbane Sling+3" out of the hands. Follow
up: Once all of the above has been completed, head for the Dragon... |