|
If you paid
Gaelan Bayle the 15,000 gold that he requested at the beginning of Chapter 2, then you
need to visit the Docks District to continue the story
line. This area is the primary part of Chapter 3. You could enter this
area before Chapter 3 (normally if you found the poisoned druid on the
world map).
When you first
enter this area, and if you have Yoshimo in your group, he will inform
you that he must speak with Renal Bloodscalp. You can find Renal inside
the Shadow Thieves Hideout. Speaking with Renal can wait until Chapter 3
(if you are in Chapter 2 still, and wanted to ask that question).
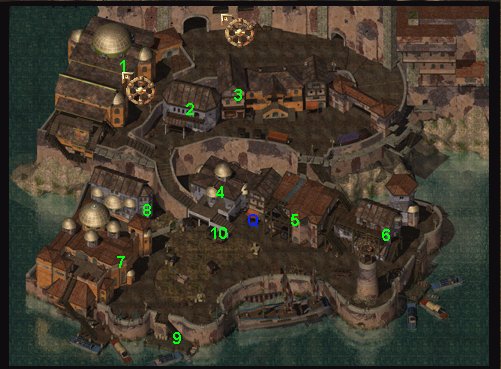
1.
Shadow Thieves Hideout
2.
Prebek's Home
3.
Valygar's Home
4.
Sea's Bounty Tavern
5.
Mae'Var's Guildhall
6.
Cromwell the smith
7.
Galvarey Estate
8.
Rayic's Home
9.
Mook
10.
Xzar
(1) Chapter
3 required quest: To continue the story line, you will want to enter
the Shadow Thieves hideout. Inside you will find Aran Linvail and Renal
Bloodscalp. You do not need to get involved with Renal, but you will
need to deal with Aran Linvail to continue with the plot (unless you
went the path of darkness and accepted Bodhi's request. In that case,
you will still need to enter the Shadow Thieves Hideout, but for
different reasons).
Aran
Linvail: Aran will give you 3 quests to accomplish before you can
continue to the next chapter.
A.
His first quest is for you to assist Mook in guarding a shipment. Mook
can be found in the Docks District, at location #9 on the map. Speak
with Mook, and then Lassal will appear. He will Kill Mook and then
attack you. Lassal will vanish before you can kill him. If you do this
quest at night, you will see that Lassal is a Vampire (but you can do
the quest day or night... It doesn't matter). Return to Aran and tell
him what has happened.
B.
Second, Aran will ask you to find information about the guild that the
Shadow Thieves have been joining. You will be sent to the Five
Flagon's Inn in the Bridge
District to listen in on Jaylos and Caehan. Once you arrive,
things could go in many different directions. The final result should
be that a Guild Contact ("Gracen") arrives. Sometimes this
does not happen (I do not know why). Be safe and save your game before
you enter the Inn. When you kill the Guild Contact, you will find the
"Contact Note". Take the note back to Aran and he
will give you his final quest.
C.
Finally, Aran will ask that you investigate
the Tomb of Bodhi. He will give you 4 wooden stakes so that you can
finish them for good. You will then need to go to the Graveyard
District, infiltrate the Lair of Bodhi, and then return to Aran.
(more info can be found here)
When you are
finished in the Graveyard District, return and tell Aran Linvail. This
will be the end of Chapter 3. You will want to finish up all the loose
ends (quests) that you have not yet done. Chapter 4 will take place in
another area.
(3) If you did
not receive a quest that involved going to Umar
Hills, you can gain a different one from inside this house (Hey at
least you get Umar Hills marked on your map). Speak with the servant and
ask about his master.
(4) Jaheira
cursed: If Jaheira is in your group, a man named Baron Ployer will
curse her when she enters the Sea's Bounty Tavern. To remove the curse you will need
to visit the Slums and enter the home to the left of the Slaver Ship
(north side of the area). In the home you will find Ployer and his 3
hired wizards. You will need to kill them all and then loot their bodies
for a "Lock of Jaheira's hair". You will gain 21250 exp
for the trouble. You will need to sleep 2 times to completely remove the
curse icon from Jaheira's picture.
Also, from
inside the Sea's Bounty Tavern, you can locate a secret door that will lead you to the
"Pirates Hideout". Kill the Pirates, and then check the
water puddle for 1100 gold and a few gems.
User Added
info:
You can
make the hired wizards leave Ployer alone to fight
you before going to Slums. If you visit Government
Building and speak with Cowled Wizard selling
licenses (not sure of his name... Corneil?), you
can ask him about Ployer's mages. He won't help you but when you
leave the building, you'll meet Terrence, one of Ployer's mages by
the entrance. Terrence will offer you to pay them 1000
for leaving baron to fight you alone. 500 gold is
ok for him too :) On bribing the hired mages,
you'll get about 10100 exp and they will not appear
in fight with Ployer.
Later,
when finally meeting Ployer, you can simply kill him or make a deal
- demand Jaheira's hair lock for leaving him alive. If you'll kill
him, you'll get 6000 exp plus 21250 exp for quest completion. In case
of deal, Jaheira screams "No quarter to Harpers killer" and
killing Ployer on her own will. In this case the script
writes something like: [Ployer is dead... Party
gained 21250 exp... Jaheira: "I'm feeling
better bla-bla-bla"... Party gained 21250 exp.] Does it mean
the party gained 21250 exp TWICE? I haven't wrote down my previous exp
numbers so cannot make sure of it... - Thanks to
Tortikoff for this excellent alternative!
(5) Spy on
Mae'var: If you accepted Renal Bloodscalps quest to spy on Mae'Var,
then you will find him in the basement of the Guild House at #5.
Enter inside
and show Gorch the papers that Renal gave to you. This will get you in
the door. You will still need to convince Mae'Var.
If you manage
to convince Mae'Var, he will give you a series of tasks to complete to
"prove" that you are who you say that you are. His quests are
listed below (A, B, and
C).
A.
Steal the Amulet from the Weathermistress in the Temple District: This
quest is easy enough (check the Temple
District map for location). When you return the Amulet to Mae'Var,
you will gain 29,500 exp, and you will be sent to Edwin (on the 3rd
floor of the Guild House) for your next assignment.
B.
Kill Rayic: You can find Rayics House at location #8 on the map. Enter
the home and work your way up to the 3rd floor. Along the way, you
will need to deal with Mephits and Golems. When you reach Rayic, you
can force him to be the aggressor by telling him that you will leave,
and then speaking with him a second time. Once you have finished off
Rayic, return to Edwin and he will give you your next assignment. You
will gain 20,000 exp for doing this task.
C.
Recover Documents from Marcus: Marcus can be found in the Sea's Bounty Inn
(which happens to be next door). When you locate Marcus, just ask him
to sell you the Documents. He will ask for 250 gold, but you can talk
him down to 200. Buy the Documents and return them to Edwin. You will
gain 10,000 exp for the task, and you will be sent to Mae'Var for a
final assignment.
D.
Kill Embarl: Mae'Var will tell you to go kill Embarl. Embarl can be found in the
Sea's Bounty Inn
(which is next door to Mae'Vars Guild House). Instead of killing
Embarl, just ask him to turn over his dagger. He will do so gladly in
exchange for his life. You may also want to ask him why Mae'Var wants
him dead. Return to Mae'Var and tell him that you killed Embarl (even
if you didn't). You will gain 18,750 exp, and you will be sent back to
Edwin.
E.
Mae'Var Strongbox: When you return to speak with Edwin, he will
tell you that he knows the real reason why you are trying to join
Mae'Var. Go ahead and confess. Edwin will then ask to side with you,
giving you the Strongbox Key, and telling you where the box is
located. On level 2, you will find a box that is locked but can not be
lockpicked. Use the Strongbox Key to open the box up. Inside you will
find "Mae'Var's Letter" and the "Boots of
Stealth". Take the Letter back to Renal Bloodscalp as proof
of what Mae'Var is up to.
F.
Finishing up: When you return to Renal Bloodscalp, you will
gain 48,250 exp, and you will be asked to return and kill Mae'Var.
Mae'Var's Guild Members will attack you when you return to the Guild
House. Fight your way through them, and then kill Mae'Var. Mae'Var
will drop 768 gold, Gems, and Shadow Armor. Return to Renal
Bloodscalp and tell him that the job is done. He will reward you with
10,500 gold and the "Short Sword of Backstabbing"
(7) If you
found a poisoned Harper while exploring the World Map, this is the
building that you need to take him to. Speak with Rylock and tell him
who you happen to have in your backpack. He will thank you and then run
inside.
(10) Xzar
(Remember him?) will approach you if you delivered the poisoned man to
the Harpers hideout. He wants you to break in... It is up to you if you
want to do this or not...
Q
- The big blue Q on the map marks a
difficult side quest. If you enter the building (marked with a Q on the
map), you will fight 3 Minotaurs. In the basement of this building you
will find a sarcophagus. Clicking the sarcophagus will reveal a
"Golden Skull" named Kangaxx. He is in need of his remaining
body parts (arms/legs and Torso). You will need to locate these
body parts in other tombs located around the city. Each Tomb is guarded
by a Lich of some sort . One Tomb is in the Bridge
District and the other is in the Unseeing
Eye Temple. Both
locations are marked on the maps of those areas. Once you have found all
of the body parts, you need to return and give them to Kangaxx. For
payment, Kangaxx will kill you. First he attacks as a normal Lich. When
you kill him, he changes into a Dimi-Lich and kills you. Well he doesn't have to kill
you... It's just highly likely. If you do manage to Kill Kangaxx,
chances are half (or more) of your party will be taking up permanent residence
in the center of the earth. You will want to save your game before
handing the body parts over, and then you should expect a very difficult
fight. If you manage to win the fight, you will gain the
Ring of Gaxx (very nice ring). This ring is one of those items that do
many things (haste 3 times a day, invisibility 1 time a day, +2 AC,
blah, blah). The ring does more then what I have listed... I just wanted
to give you the basic idea.
USER
SUBMITTED TIPs:
In Waukens promenade one of
the merchants has 2 scrolls of protection against magic,
they provide 100%magic resistance for 10 turns, if
you use them he shouldn't be any problem. The
ring he has is well worth the effort.- Thanks
to Andreas Sångberg for this tip.
In the final battle where you duel him it is actually
possible to get 2 Rings of Gaxx. Simply have an
able thief stand next to where Kangaxx will raise
from the ground. You have about half a second to
pick pocket him. If successful you will receive a
Ring of Gaxx (possibly the best ring in the game).
Then after defeating him you will get another Ring
of Gaxx. Just thought you'd want to know. Seeing
as everyone should know how to get two of these awesome
rings in one game. - Thanks to Kiljam for this
awesome tip!
|