|


 News News

Reviews
Previews
Movies/Media
Downloads
Hints/Codes
Game Guides
Special Features
Beta Center
Release Calendar
Forums
Top Games

Action
Adventure
Driving
Puzzle
Role-Playing
Simulation
Sports
Strategy

PC Newsletter
HW Newsletter

Join GameSpot

3D Browser
CD Center
GameFAQs
Netflix
|
|
|

|
|
|
|
|
|
|
Unlocking the Final Seal, the seal is in the middle of the room |
Unlock the final seal and confront the imprisoned one |
There are three pillars that are securing the seal. You must get a key for each. Follow the following detailed instructions to get the keys. When you use the key, you'll face an extremely tough group of guardians. |
20,000 experience points per party member for using each of the three keys. |
You arrive into the main room of this level in front of the final seal to the imprisoned one, and it's secured by three pillars, each needing a key. There are three large doors, each of which ultimately leads to a key.
The southern door from the main room leads to an encounter with a friendly helmite ghost who is standing in front of three doors, each representing a challenge. Of those three new doors, the farthest east leads to an encounter with an imp, who will first ask you a question (the answer is 7, which will earn each party member 10,000 experience points), then initiate a coin game. To win, you essentially must get the imp down to five coins. So, go first and select two coins. No matter what his response, you can to get him down to five coins. Then, finish him off and get 21,000 experience points per party member. The door to the west leads to a room of orcs, orc mages, and orc archers. They're weak opponents (although the "regular" orcs are actually souped up fighters that'll earn you 1,000 to 2,000 experience points each), but they'll constantly reappear, so spread your fighters out around the respawn points, so you can take them out as they arrive. The mages will occasionally cast fireballs, but they'll damage the orcs more than your party, but keep an eye on your hit points, so that you can take healing potions if necessary. Once you've dispatched a few dozen orcs, the helmite ghost will appear and announce that you've completed the challenge and earned 21,000 experience per party member. Behind the center door is the real challenge among the helmite ghost's tests: a green dragon. For a dragon, it's not as dangerous as others because of its choice of spells and inherent spell effects (entangle, stoneskin). Summon some creatures to distract him, use haste and giant strength potions, and cast breach and pierce to remove its stoneskin protections and lower its magical resistance, so that it becomes more vulnerable to sequenced magic missiles and other offensive spells. For taking the dragon down, you'll earn 62,000 experience points and 21,000 experience points per party member from the helmite ghost. You'll also get 10,000 experience points per party member for completing all three challenges once you exit the final room and encounter the helmite ghost again.
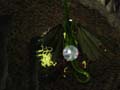
Jolly green giant. Unlike the other dragons you may have met, you can't avoid battling this fellow. Fortunately, he's weaker than most of the dragons you'll face, although you'll still have to prepare well prior to starting the battle or you can lose control of the battle quickly. |
The key you get from the helmite ghost will open the northwest lock on the seal, earning you 20,000 experience points per party member and an encounter with one of the toughest group of monsters in the game, including a hive mother beholder, a djinni, and a range of spellcasters and melee opponents. Ensure that you have protected your party as well as possible before you open the seal by summoning a few powerful animals or monsters and using haste, stoneskin, mirror image, blur, protection from evil, defensive harmony, chant, bless, and similar spells. Also ensure that your fighters take potions of giant strength or heroism. You'll have a brief opportunity to attack the enemies the instant they arrive before they can raise defenses, but it's difficult to take them down before most party members (including the hive mother) cast improved mantle making them temporarily immune to most attacks until you take those defenses down. Concentrate on removing defenses using breach and pierce spells, while your fighters concentrate on the opponents that are vulnerable to attack. The djinni, Y'tossi, will summon skeletons to distract you. Nalmissra drains levels with her melee attacks. Ameralis Zauvir is a druid that likes to summon insect swarms to ruin your spellcasting.
The northwest door from the main room leads to a room guarded by spiders (who aren't very dangerous), followed by a room with four colored columns. Every time you press one of the buttons, you'll gain 1,000 experience points per party member and have an encounter, as follows:
- Press green: Spiders, umber hulks, greater earth elementals, and beholders (death tyrant, elder orb, and hive mother)
- Press red: Hobgoblins, kuo-toa, trolls (giant and spectral), and wolfweres
- Press blue: Successively higher mages
- Press purple: Skeleton warriors, shades, vampires, and liches (elemental and normal)
Once you've placed one of the matching colored globes into each of the four pillars, you'll get 10,000 experience points per party member and the key to the seal in the main room. So you only have to fight four times, although you can elect to fight some more to get more globes (which have random magical effects when used from your quick slots) and gain experience. But don't put the globes in the columns if you want to continue the battle. The key opens the northeast lock in the level's main room, earning you 20,000 experience points per party member.
When you trigger the northeast lock using the key, you'll be attacked by a group of guardians, led by Aurumach Rilamni (mage, 28,000 experience points) and his not-so-lesser companion Ferrumach Rilamni (8,000 experience points). Aurumach is your main challenge, since he's a high-level mage that'll cast time stop, ice storm, and other disruptive spells; he's also a dangerous melee opponent. Concentrate your firepower on him and remove his shields using pierce and breach spells.
The northeast door from the main room leads to a room guarded by a pair of fire giants, which should be easy cannon fodder. Although, you should ensure that your front-line fighters are equipped with superior healing potions or boots of Speed to react if their hit points get low. Once the giants are gone, touch the altar (you need the skull from the dragon room). You'll enter a mini-game and be given a spiritual avatar that you must guide through a maze. You can't save your progress during your navigation of the maze.
To get through the maze, go east and kill the goblin. Then, go east again and examine the treasure chest and fight the skeleton that appears. You'll be rewarded with a wand of magic missiles and 4,000 experience points per party member. Go north and fight the war dog to get another 4,000 experience points per party member and an iron key and healing potion. Go west and examine the room to get a gibberling scroll, then go west again and ignore the fountain in that room (it poisons your character). Go north and fight the spectral figure, using the wand of magic missiles to get an early attack in. You'll get another 4,000 experience points per party member and a magic helm as a reward. Go east twice, and unless you've taken a beating in your fights so far, open the dresser. You'll take some poison damage, but if you're fit enough to survive, you'll get some magic bracers that will make the remainder of the game easy. The rest of the path is linear. Go north and use the gibberling scroll to avoid a fight and get 3,000 experience points per party member. Then, go west, and the iron key will let you get another healing potion and 3,000 experience points per party member. Go west one last time and fight the mummy, using the wand of magic missiles at the outset of the battle. Once you've done all that, you'll be ready for the final seal.
|
|