|
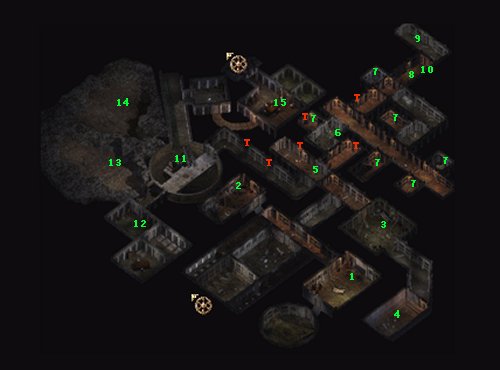
As you step
into level 2, prepare yourself for an ambush from archers on the side
walls. There are secret doors that you can use to chop them up in melee
combat, but by the time that you did that, you could have taken them out
with spells and arrows. Once the fighting ends, head further into the
area. Be careful of this place. There are a lot of highly dangerous
Monsters scattered all around the area.
Your goal is
to free Iltha, and deal with Firkraag. However, you will want to explore
the entire area for all of the items that are scattered about.
(1)
You will meet the Troll Cook. After dealing with him and the Monsters
who attack with him, check the broken table for the "Orcish Cook
Book". Now, you do not really need this book, but reading it
will tell you a little information about the area.
(2)
Derg and Flaylan the Orc. Speak with them for a little
information about the area.
(3)
Vimpires! Use caution in this room. These Vampires are not to be toyed
with. However, you will need to get by them (by killing them) so that
you can reach location #4.
(4)
Search the small pieces of wood on the floor of this room for the Chapel
Key.
(5)
Speak with Semia for a briefing of the area. She will also give you
"Semia's Key".
(6)
Check the floor of this room for a pile of books. You will find the
"Book of King Strohm III".
(7)
At each of the locations marked with a 7, you will need to locate a
piece of the mask. Be careful for the Director (a powerful Beholder)
along the way. Once you have found the pieces to the mask, they will
turn into the "Mask of Kink Strohm III". You need to be
wearing this mask to see the Final Guardian.
(8)
Final Guardian - You will be able to see him (and fight him) only while
one of your characters are wearing the mask.
(9)
After defeating the 7 Guardians, locate the last room, and click on the
floor. You will discover the "Dragonslayer" sword and
the "Dragon Scale Shield +2".
(10)
Semia will ambush you as you exit with the treasure. She does not come
alone. You may want to plan ahead for this fight. Save your game
before gathering the Treasure!
(11)
When you enter the room marked #11, notice the wench. If you turn it 2
times, you will pull up the Dragon Helm (and an Air Elemental).
(12)
Werewolf Ambush (enough said). Search the back room for the Horn of
Blasting, and a large amount of gold.
(13)
Secret door (near the bickering Monsters).
(14)
Warning! This area holds a few minor Golems, and one huge Adamantine
Golem. Use clubs, flails etc against him, as swords have little effect.
To make things worse, This golem is all but immune to spells. Your best
chance against this thing is to summon stuff to fight it for you. Once
the Golem is dead, search the back wall of his "cave" for the
"Heartseeker +3" bow. Alternatively,
you could have ran in and grabbed the item and then ran out (the huge
golem can not follow through the small doorway).
(15)
In room #15, you will find DigDag and Tazok, whom are
guarding Iltha. This may be a difficult fight for you after all that you
have been through. You may want to rest or at least save before entering
the area. DigDag will drop "Delver's Plate +2" and
Tazok will drop the "Sewer Key".
Follow up:
After checking the level out, and after the many difficult battles, head
down to meet Firkraag. You can find the stairs just past the cell that
Iltha is being held in.
|