|
When the game
starts, you will be caged and tortured by “The Master”. After the
short intro sequence, Imoen will enter the room. She broke out of
her cage and has come to free you. At this point, you need to try to
escape this dungeon. Alone the way, the story unfolds...
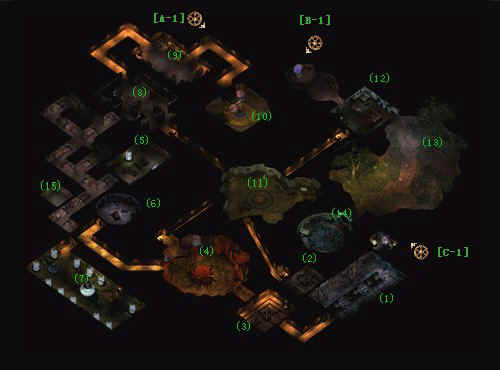
(1)
In the room with the Cages, Speak with Minsc. You will
want to insult him and his Hamster friend a few times. He will become so
mad that he will break himself out of his cage. After he has done this,
you need to sooth him by being friendly (no more insults). If you are
mean to him after he frees himself, he may not join your group.
You
can try to free Jaheira from her cage, but the door is locked solid. Do
not try to anger her. She will not find any hidden strength to break
herself out. Instead she will “snob” you and not join the group. In
fact, do not even make hints about leaving her behind.
(2)
You will need to find a key to get Jaheira out of her
cage. Locate the Jailkeep Golem in the room near the cell that you were
in . In the chest in this room you will find armor for your guys (or
girls) to wear. Behind the picture in the room, you will find a dagger+1
and some health potions. You will need to have Imoen disarm the trap and
pick the lock on the picture.
On
the table in the center of this room you will find some weapons for your
guys and the key to Jaheira’s cage.
(3)
Once you have your group free, enter the hallway to the south of your
old cage. You will find a room with a lightning machine that is
producing lightning Mephits. On the side of the room you will find a shutoff
switch. Shutdown the lightning machine and then continue ahead.
(4)
You will come to a room with large scattered
around. In the center of this room, Aataquh the Djinni will be waiting
to meet you. He will want to ask you a question. You can refuse to
answer it, but there is no fun in that. If you answer “I would push
the button”, then Aataquh will summon an ogre mage to fight you, and
you will gain a positive (good) appearance to your group. If you select
“I would not push it”, you will fight a goblin and gain a negative
(evil) appearance to your group. After you kill the Ogre Mage or the
Goblin, Aataquh will tell you to seek out Rielev in help escaping this
area. You can rest in this area to recharge spells. On your way to
locate Rielev, you may find the Life Support room and the Sewer Golem
room. You can speak with the Golem now if you like, but you will need to
return later anyway.
(5)
A little past the Sewer Golem Room, you will find Rielev’s
room. He is the guy in the glass bottle. Release him from his misery by
removing the crystal from his life support system. He will thank you by
telling you to speak to the other bottles (in the life support room). Be
sure to check the table in this room for the Activation Crystal. There
is also a barrel with a few items inside.
(6)
The Sewer Golem has no eyes and he believes that you are his
master. Play along and ask him to open the door to the Sewers. He will
be unable to do so because his Movement Functions need to be activated
with an Activation Crystal. You should have found the Crystal on
the Table in Rielev's Room.
Use
the Crystal to activate the Golem so he can open the doors for you.
While the Golem is away, spend a little time cleaning his room out. You
can find a couple Scimitars and a "Long Sword +1". If you
speak with the Golem when he returns he will give you a bit of info
about the Guardian.
(7)
Return to the life support room and speak with each of the four active
bottles. They will give you a few misguided details of the area. The key
that they speak of is the key that you used to free Jaheira. Listen to
the part about the statue and the part about the "Mistresses
Room". The Life Support room will have a few items inside some
boxes and a barrel. Be careful for the trapped box (Imoen can disarm
it).
(8)
Drop by the library for a bit of reading. If your not quite up to
reading all of the books, then just grab the items hidden in the book
shelves.
(9)
Follow the north path from the library to the Duergar’s room. Ilyich
will speak with you for a second, and then he will have his Duergar
friends attack you. You may want to save before attacking these guys.
All of the Duergar’s will drop decent items, but Ilyich will drop the Mail
of the Dead +2, and the Dryad’s Magic Accorns. Search this room
further for items in the chests.
(10)
The room with the "Mechanical Sculpture"
holds a strange guy named Cambion. There is no dialogue or
anything, but when you click the Sculpture you will gain a little
information. Click the Sculpture a second time, and the globe
surrounding Cambion will vanish. Cambion will attack you. Once he is
dead, pick up the +1 Bastard Sword and Chain Mail that he drops.
(11)
Now, with the main area clear, head for the Sewers. as you enter
the area, a Otyugh will attack. This isn't a difficult fight, but it is
not an easy one either. When the Otyugh dies, loot the corpse. You
should find the "Wand of Frost Key". Also, if you
search the area, you can find a Helm Of Infravision and a couple
of spell scrolls.
(12)
If you listened to the "bottles" in the Life Support
Room, then you heard mention of this room. The "Mistresses
Room" is loaded with traps. You will want to use Imoens
"Detect Traps" skill while you are in this room. The Misstress
Room hold a lot of good items. The "Helm of Balduram"
and the "Metaspell Influence Amulet" can be found in
this room. Also, you will find the "Wand of Lightning Key"
and the "Air Elemental Statue", which you will need to
use in your escape.
(13)
Just outside of the Mistresses Room, you will find the three Dryads;
Ulene, Cania, and Elyme. You should have already found the Acorns from
Ilyich, so tell Ulene that you will help her. She tells you to locate
the Fairy Queen northeast of the town Trademeet, and at the south
end of the Windspeer Hills.
(14)
South of the Dryads is another room. This room happens to be the Masters
Chambers. Have Imoen use her Detect Traps skill in this room. You
will sound an alarm as you enter, which will activate the two Lesser
Clay Golems at location (15) Search the room for the "Bracers of Defense",
"Pommel Jewel of the Equalizer", the "Portal
Key" and 2 spell scrolls.
[A-1]
Use the Statue that you found in the
"Mistresses Room" on the door marked [A-1]. You will enter a
new area.
[A-2]
or
[A-3] You
can use either portal to access level two of this Dungeon.
Also:
I add the descriptions for the exits for the first dungeon only. This is
to assist you in becoming use to the "interactive"
walkthrough, and how it all works.
Also:
At the bottom of each page, check for "Also" notes,
"Quests", and "Follow ups".
|