|


 News News

Reviews
Previews
Movies/Media
Downloads
Hints/Codes
Game Guides
Special Features
Beta Center
Release Calendar
Forums
Top Games

Action
Adventure
Driving
Puzzle
Role-Playing
Simulation
Sports
Strategy

PC Newsletter
HW Newsletter

Join GameSpot

3D Browser
CD Center
GameFAQs
Netflix
|
|
|

|
You'll immediately be confronted by Draconis, the son of Abizagal. He won't look intimidating, but you should summon some creatures (devas and planetars work best, since they're not susceptible to death spells) and protect the party from fear and engage. He'll go down apparently pretty easily, but will just turn into a barely wounded brown dragon--and a particularly tough one. He loves to turn invisible and cast non-detection, which makes it difficult to target him with the breach and pierce spells needed to get through his defenses (he likes to cast protection from magic weapons, which you must breach to start doing some damage to him). Keep a true sight active at all times to deal with his invisibility and his tendency to cast mislead spells. He also summons invisible stalkers, but you should predominately ignore them, unless Draconis still has protection from magic weapons active and your fighters are near the stalkers. He'll spit acid instead of fire, so you should protect your party from acid if you have handy scrolls available or the spell memorized. You'll earn 61,000 experience points for taking out Draconis as well as access to Abizagal's lair.
Entering the lair, you'll run into a greater werewyvern servant (Ekim Cyre) and a group of lesser earth elementals. There's a chain lightning trap right at the entrance, so let your opponents come to you while you hit them with ranged weapons. Ensure that you pick up the empty breath potion flask on the greater werewyvern's body and proceed down the hall, watching for the trap at the end just in front of the northern door (x680, y291). The only place you can go is down to the steaming water hole on the far left, which will lead you to a group of frost salamanders, followed by a room with a couple of bone fiends. In that room, the dresser is trapped, and there's a fountain in which you can fill up the empty breath potion flask.
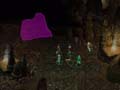
Three stoned men. Next to these hapless adventurers, you'll meet Iycanth the Mad. The eye stalk he's looking for is down the pool to the immediate right of the adventurers |
You can now go down the steaming water hole on the far right, which will lead you to a few rooms guarded by greater water elementals, Olhydra (the elemental prince of water), and a large group of kuo-toa. Kuo-toa are still vulnerable to instant death spells like death spell and fighter abilities like deathblow, so they shouldn't hold you up for long. In a cell, you'll find a dying monk sent by Balthazar. Before the monk dies, he'll give you some rope. He also has Hindo's hand.
There's two remaining steaming holes you can enter. The northern one leads to the eastern side of a labyrinth with flying eyes. While the southern one leads to a large room guarded by Fll'yissetat, a green dragon. There's also a hole in the southeast corner of the dragon room that leads to another area of the eye labyrinth. The labyrinth with the eyes isn't difficult, although eagle eyes and seekers are capable of meeting out good damage with ranged attacks. In the northwest corner of the map, you'll run into three adventurers who have been turned to stone. All you must do is turn one of them back using a spell or scroll of stone to flesh, and they'll all come back to life. Iycanth the Mad is also in the area, and he'll ask you to get a gauth eyestalk in exchange for the scroll of reversal that the Monk indicated that you'd need to free Fll'yissetat. The pool directly east of the three neophyte adventurers leads to a room with a gauth beholder and three elder eyes. Pick up the gauth eyestalk when you kill it and return it to Ilycanth, and you'll get 30,000 experience points per party member. Alternatively, you can just kill him and take the scroll (or kill him after you get the experience point reward to get an additional 20,000 experience points), but doing so will summon some more deadly eyes to his defense. You can take the items on his desk without killing him. If he flees, use the pool to the left of the adventurers to get through to his lair.
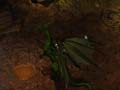
Arrogant ally. Although there's no need to fight this dragon, and you're specifically given a quest that permits you to avoid battle, you'll be able to acquire a ring of improved invisibility if you take it down. |
The dragon, Fll'yissetat, won't attack initially, and he's there unwillingly, but malevolent parties quickly try to take him out by surrounding him with fighters and hacking away. By the time the dragon goes hostile, it'll be half dead and easy to finish off. It can cast entangle on itself, but otherwise, it's one of the weaker dragons you'll encounter (worth 60,000 experience points). It has a ring of improved invisibility and Abizagal's wardstone on it. Or, you can release him using the reversal scroll and earn 10,000 experience points per party member, although you won't get the ring of improved invisibility. If you antagonize the dragon by asking him for respect, it'll attack you even though you released it.
Finally, you can take on Abizagal (210 hit points, AC -12, three attacks per round, 1d8+10 per claw, 55% magic resistance), who is easily the most formidable dragon you'll face in the game. Don't move very far into the room. Instead, head south, hugging the wall, and take out any frost salamanders you encounter (use missile weapons, so you can stay near the wall).

In the lair of the beast. You'll make your encounter with Abazigal much easier if you wander counterclockwise along the perimeter of his lair and take out the frost salamanders with ranged weapons without encountering Abazigal. |
Continue circling the room counterclockwise, taking out the salamanders as you encounter them. You can take almost all of them out before you're confronted by Abizagal, who will be in human form. Like his son, Abizagal isn't particularly tough in human form, so take advantage of the lull in the storm to summon some powerful allies like elementals, devas, planatars, mountain bears, and a juggernaut golem. Your party members will be blown back when Abizagal turns into a dragon, so ensure that you already have it surrounded and can move back into position quickly (if you haven't taken out the frost salamanders, they can be fatal to unconscious party members who are recovering from wing buffet). Holy smite works very well against Abazigal. Keep breaching Abizagal's defenses and getting your fighters in melee range, and you'll eventually get 40,000 experience points per party member for taking down the fourth of the five mighty Bhaalspawn.
|
|